See Timeline of YouTube Shorts

You’re probably here because:
- You are editing a YouTube Shorts video
- But you can’t see the timeline
This guide teaches you how to generate the timeline for any Short.

What is the Timeline on YouTube Shorts?
The timeline on YouTube Shorts is the editing interface where creators arrange and manage video clips, music, text, and effects in a sequence.
It allows you to control the order, duration, and transitions of each element, helping to create a cohesive and engaging Short.
How to Generate Timeline for YouTube Shorts
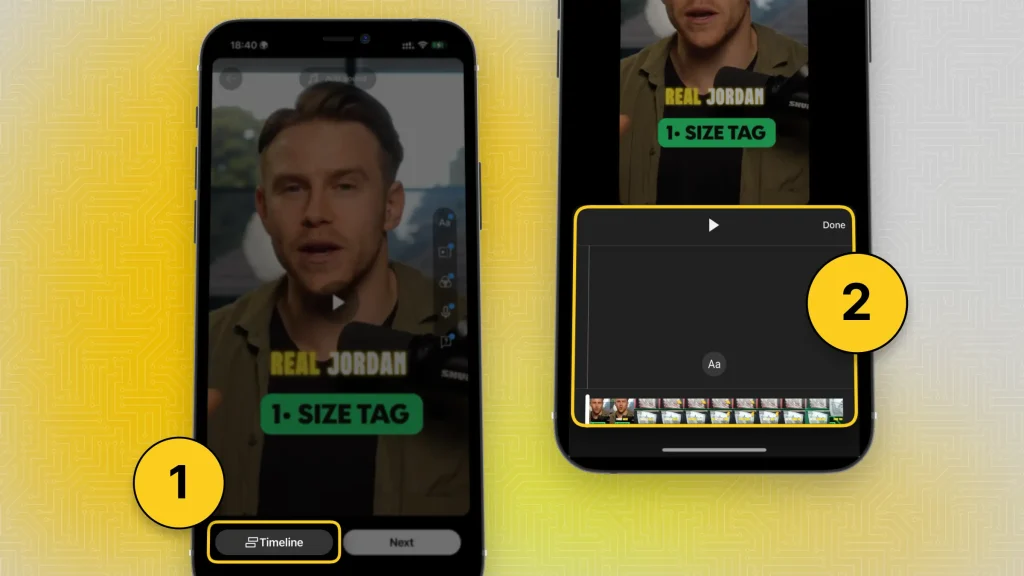
Answer: Launch the YouTube app and tap the “Upload” button and select “Shorts”. Upload or record a video, and in editing, click “Timeline” in the bottom-left corner.

- Open the YouTube app
- Add your video
- Tap the tick that sends you to editing
- Tap “Timeline” in the bottom-right corner
- Timeline will now open
That’s right about it!
Why Use the Timeline when Editing YouTube Shorts
Shortly: Because revealing the timeline helps you achieve better organization, efficiency, and control, ultimately producing higher-quality YouTube Shorts.
Though, here are the 4 main reasons to do this.
1. Precise Control Over Edits
The timeline lets you see and adjust the order, length, and transitions of clips, making it easier to fine-tune the video for a smoother, more professional look.
2. Efficient Editing
With the timeline visible, you can quickly add, cut, or reposition elements without losing track, speeding up the editing process and ensuring everything flows well.
3. Improved Storytelling
Seeing the full sequence helps visualize the story or message you’re crafting, allowing for a more engaging and coherent video that resonates with viewers.
4. Accurate Synchronization
The timeline makes it easy to align music, text, and effects precisely with specific video moments, enhancing the video’s impact and viewer experience.

FAQs
1. Can you change the order blocks/elements of YouTube Shorts?
Yes, you can change the order of blocks/elements in YouTube Shorts in the timeline before uploading, during the editing process.
2. Can YouTube Shorts be edited after posting?
No, YouTube Shorts cannot be edited after posting. You’ll need to delete the original and re-upload the edited version.
The only thing you can edit are the title, description, and comments settings.
3. Why is the timeline important in editing YouTube Shorts?
The timeline is important in editing YouTube Shorts for several reasons:
- Precise Cuts: It allows for accurate placement of cuts and transitions, ensuring that each moment is timed perfectly to maintain viewer engagement.
- Short Duration: With a maximum length of 3 minutes, the timeline helps editors condense content, making every second count to deliver impactful messages quickly.
- Visual Flow: A well-structured timeline ensures a smooth flow of visuals and audio, creating a cohesive narrative that captures attention.
- Layering Elements: Editors can layer video clips, text, and effects on the timeline, allowing for creative combinations that enhance the storytelling.
- Easy Adjustments: The timeline facilitates easy adjustments, enabling editors to rearrange clips or make edits without starting from scratch, which is essential for efficient content creation.
Using the timeline effectively can significantly enhance the quality and appeal of YouTube Shorts, leading to better viewer retention and engagement.
Thanks a lot for reading this,
David Ch
Head of the Editing Team at SendShort


